Automated Socks Proxy for Ubuntu

I occasionally need to be able to secure my traffic while I’m out and about. I’ve written the following script to automate Ubuntu desktop to configure and connect to a remote ssh host for system-wide proxying.

Let me know if you have any trouble with it.

Integrate PHPStorm, Behat, and Vagrant

Behat tests can be initiated right from PHPStorm, saving a lot of hassle, as well as simplifying access to tests for less technical users.  Behat v3.3 does come pre-installed via composer and is found at /usr/local/bin/behat.  If you wish to use your own version of Behat, you’ll need that path later.  At Bryn Mawr, we have behat as part of our repository, so we use that path instead of the default /usr/local/bin/behat one.

Here’s some things you’ll need to have before starting:

  • PHPStorm open and licensed
  • RV project up and running
  • Behat path in the vagrant box
  • Behat.yml path
  • A Behat feature to run

PHPStorm Setup (File->Settings)

  1. Press the button for Project Root and press OK
  2. Settings Changes (File-Settings)Editor > Code Style
    1. Click Manage and import PHPStorm-Drupal.xml from [Project]/buildFiles/configs folder
    2. Version Control
      1. Remove the Project Root folder, add public_html
  3. Build Execution & Deployment > Deployment
    1. Add a new connection > Local or mounted folder
    2. Set Project file folder to point to [Project]/public_html
    3. Set Web server URL to http://website.vbox.local
    4. Change Deployment path to “.” under the mapping tab
  4. Language and Frameworks > PHP
    1. Change PHP level to 5.3 (RV uses PHP 5.3 by default.  Change this if you decide to upgrade to a different version)
    2. Add CLI Interpreter
      1. Remote > Vagrant
      2. Change name to “Rampant Vagrant”
    3. Select the CLI interpreter to “Rampant Vagrant”
    4. Add a path mapping for [Project]/public_html to /vagrant/public_html
    5. Behat Configuration
      1. Click to add a new Behat instance
      2. Select “Rampant Vagrant”
      3. Set path to be the appropriate behat path
      4. Set default runner path to the path of your behat.yml file
  5. Close Settings

You should now be able to run behat tests in the vagrant box right from PHPStorm.

Happy Testing!

Netbeans is here!

A new IDE

I found Codiad to be limited in its capability, but I wanted to find another free IDE to use with the project.  I came across Netbeans. After a little wrangling, the RV project has a new IDE option!

I removed Codiad from installing and have left it up to the end user whether or not to add an IDE.

Installing Netbeans

In order to get Netbeans installed, the script found at [Projectroot]/bootstrapscripts/CentOS/netbeans81.sh should be called from within the VM. This installs netbeans to the [Projectroot]/apps/netbeans81 folder, as well as pre-configures it with many settings.  The script is already suggested in the local.vagrant.yml.example file under the IDE category.

Running Netbeans

To run netbeans, you have a few options:

Run from the Host Machine

Since the application is installed to the [Projectroot]/apps directory, you can manually run the application by finding the appropriate executable under the [Projectroot]/apps/netbeans81/bin directory.  Please note that the host machine requires Java 8 or similar equivalent (e.g. openjdk 1.8) installed.  This will not come pre-configured for the vagrant project.  If you wish, you can extract and copy the configs from the [Projectroot]/buildFiles/configs folder and move them to your host’s user home directory.

Run from the vagrant box

If you choose to run Netbeans from the vagrant box, you must connect with a remote X session and then run:

$ netbeans

A remote X window session can be initiated by either using the ssh flag -X

$ ssh -X vagrant@website.vbox.local

or you can configure a Putty session using the instructions here, coupling it with XMing on Windows.

Setting up Putty for Rampant Vagrant

SSH keys are sometimes required for steps throughout the project. Make sure that you have created the key, and that it exists on your host at ~/.ssh/id_rsa. On Windows, I highly recommend that Putty is used for ssh-ing into RV instead of using git-bash/ PHP-Storm. Putty offers a one-time pass-phrase login via Pageant that carries over to other machines via agent forwarding.

  1. Convert key to Putty compatible key
    1. Open Puttygen and select the Conversions menu
    2. Import the id_rsa key ~/.ssh/id_rsa
    3. Select the “Save private key” and save the file as ~/.ssh/private.ppk
    4. Copy the Public key shown in the window and save as ~/.ssh/authorized_keys. Do not use the “Save public key button”.
  2. Create Putty connection to the vagrant box
    1. Hostname: 127.0.0.1
    2. Port: 2222
    3. Under Connection menu in the left pane:
      1. Data->Auto-login username: vagrant
      2. SSH->Auth
        1. Check the box for Allow agent forwarding
        2. Browse and select your private.ppk key file
      3. SSH→X11
        1. Enable X11 Forwarding
        2. Set the X display location to “localhost:0.0”, minus the quotes.
      4. Select Sessions again on the left panel
      5. Name the save session: website.vbox.local
      6. Click Save button
  3. Configure remote box for SSH key access
    1. Append the contents of your host’s ~/.ssh/authorized_keys to the VM’s ~/.ssh/authorized_keys.
    2. Logout of the vagrant box.
  4. Run Pageant on your local machine and load your private.ppk file.
  5. Open Putty and double click on the newly created saved session name (website.vbox.local) under Default Settings.

The server should auto-connect without prompting for a password/ passphrase.

Configuring Remote Xdebug and PHPStorm

Rampant Vagrant comes with XDebug installed and enabled in the guest OS by default with the IDE key of “vagrant”.  With a tradeoff of performance, we are able to remotely debug our code in a tool such as PHPStorm.  We’ll be configuring PHPStorm and Firefox to connect to a debugging session on the vagrant box.

First, get an instance of the RV project up and running.  Also, open up PHPStorm on the host machine.  I’m using the latest version of PHPStorm, 2016.3.2 as of writing this.

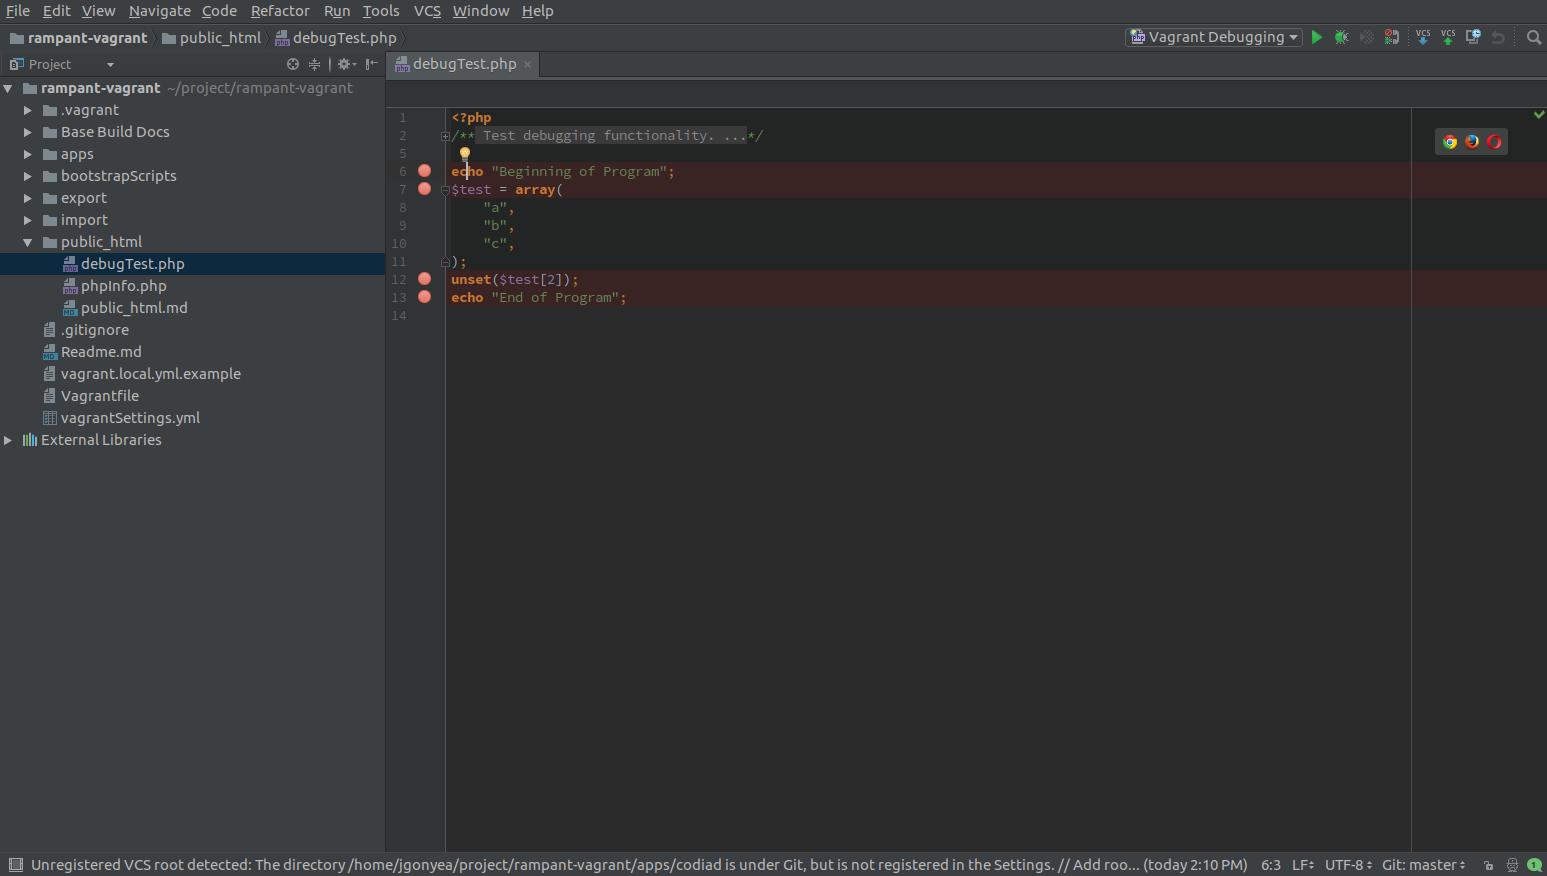
Save a new PHP file called debugTest.php within the public_html folder of the project with the following content:

<?php
/**
 * Test debugging functionality.
 */

echo "Beginning of Program";
$test = array(
    "a",
    "b",
    "c",
);
unset($test[2]);
echo "End of Program";

Within PHPStorm, Click on File->Settings and select the PHP servers. I configured mine in this way:

I added a new server and named it “Vagrant Server”.  The Host is the hostname of our vagrant box, which for this project is “website.vbox.local”, and we’re using port 80. You’ll want to also map the absolute path on the server, using “/vagrant/public_html” to map to your project’s public_html folder.

After saving the server configuration, select the Run menu and then Edit Configurations.  Create a new PHP Remote Debug configuration with the following settings:

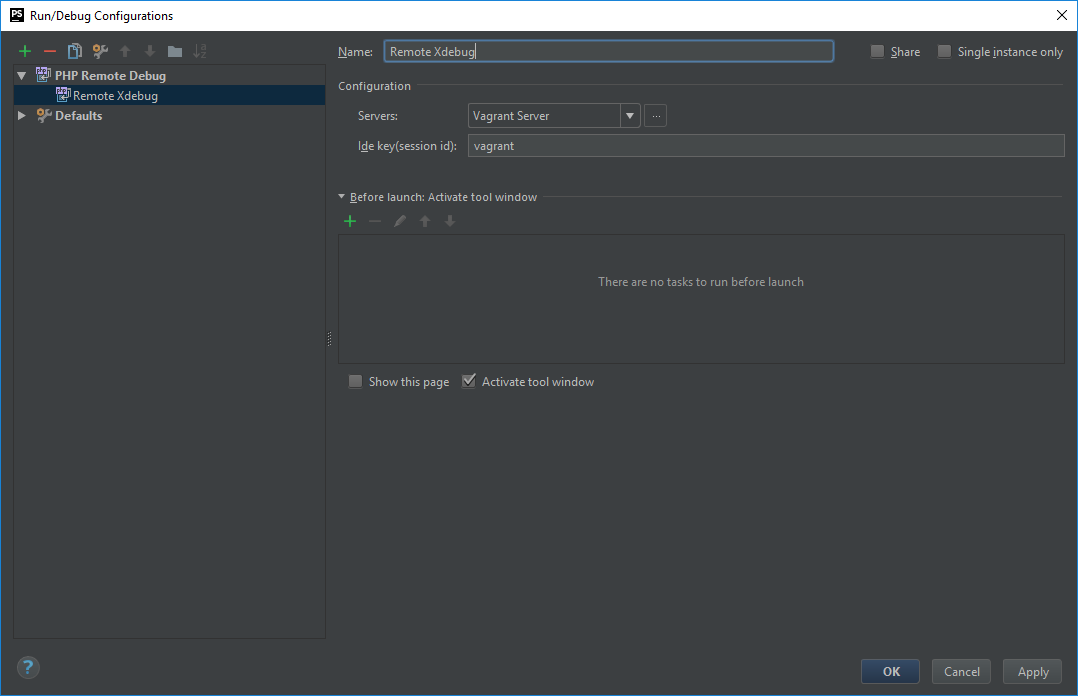
The Server name should match the same one we just created.  Set the Ide key to ‘vagrant’.  Then click Run->Debug ‘Remote Xdebug’.

Open debugTest.php within the IDE and add some breakpoints by either selecting a line and pressing Ctrl+F8 or clicking just to the right of a line number.  A breakpoint is noted by a red circle on the left side.

In the Firefox browser, install the extension EasiestXDebug.  After installing the extension, click on its options and set the Ide key to match ‘vagrant’.  Click the button in the browser to enable debugging.


Visit http://websiter.vbox.local/debugTest.php in the browser.  The php file can now be stepped through.  If you make a breakpoint at each line, you’ll note the temp array start with 3 elements and then loses the last array element as the unset command executes.


Behat, A Quick Introduction

Perhaps the single-most helpful thing I learned about while at the DrupalCampPA was Behat.  Behat is a behavioral driven testing framework that lays out tests in English that are then translated to PHP and other commands.  A simple test might look like the following:

Feature: Listing command
  In order to change the structure of the folder I am currently in
  As a UNIX user
  I need to be able see the currently available files and folders there

  Scenario: Listing two files in a directory
    Given I am in a directory "test"
    And I have a file named "foo"
    And I have a file named "bar"
    When I run "ls"
    Then I should get:
      """
      bar
      foo
      "

The basic structure of a behat test is to define the overall feature in a storytelling context:

  1. Feature to be tested
  2. In order to do X
  3. As a user USERTYPE
  4. I should be able to perform ACTION

The rest of the test consists of steps that a user takes (thus the behavior-driven name), which is written in “regular” language.

But what does it do for me?

As websites become more complex, it is increasingly difficult to test all features manually.  Behat tests provide an automated way of ensuring that features work as intended with each upgrade.  It’s a great safety net to the deployment process.

Git and Home Directories

If you’re on an AD bound, Windows machine, your home property may be pointing to your network home drive.  This presents all sorts of issues, not the least of which is slow performance since the virtual machine will essentially be running across the network.  To fix this, we can force the HOME variable to point to your local workstation:

  1. For Windows 8+, right click on the windows button in the lower left hand corner and select “System”
  2. For Windows 7/ XP, right click on the My Computer icon and select Properties.
  3. On the left, click”Advanced system settings”
  4. Click on the button “Environment Vairables…”
  5. In the top half section (user variables for <YOUR USERNAME>), click the button “New”
  6. Variable Name should be “Home”, without quotes
  7. Variable value should be the path to your local home directory (i.e. C:\Users\jgonyea)

You’ll need to log out and back in in order to have the changes fully apply.  Open a Git bash window and cd to “~” without quotes.  If you list the files, you should be looking at the ones on your local machine vs. the ones on your home directory.

Drush via an SSH Proxy

Our production environment isn’t available off-campus to SSH, but we do have an SSH proxy for other services.  Using a VPN was possible for Windows and Macs, but there wasn’t a client for Ubuntu.  After a small discussion with our networking engineer, he suggested the following option:

ssh -t <proxy server> ssh <production server>

The “-t” option performs the following (from the ssh man page):

Force pseudo-tty allocation.  This can be used to execute arbitrary screen-based programs on a remote machine, which can be very useful, e.g. when imple‐menting menu services.  Multiple -t options force tty allocation, even if ssh has no local tty.

To make drush utilize a proxy server, edit the aliases.drushrc.php file to contain the following:
//Production
$aliases['prod'] = array(
.
.
'remote-user' => username,
'ssh-options' => '-At username@<proxy server> ssh -A',
.
.
.
);

The first “-At” option passes along the ssh-agent key to the proxy server, using username to login to the proxy server.  The second portion then logs into the production server via the proxy server.

Sql-sync’s and rsync’s can now be performed as normal.